Table of Contents
- Overview
- Complete Connection Process
- Pre-Connection Checklist
- Step-by-Step Setup Guide
- Permissions Reference
- Custom Fields & Records
- Post-Setup in Core8
- How Core8 Connects
- Troubleshooting
- Additional Resources
Overview
This guide provides comprehensive instructions for setting up NetSuite integration with Core8. Follow each section carefully to ensure successful integration.
Quick Links
| Resource | Description |
|---|
| OAuth 2.0 Client Credentials | Certificate-based authentication setup |
| REST Web Services | REST API configuration |
| SuiteQL Docs | Query language documentation |
| Roles Guide | Permissions configuration |
Complete Connection Process
This section provides a high-level overview of the entire connection process. Follow these 4 steps in order:
- Enable required features
- Locate your NetSuite Account ID
- Create integration record and save Client ID
- Configure role permissions and required settings
Step 2: Generate Certificate in Core8
- Navigate to NetSuite integration settings in Core8
- Generate and download the certificate (.pem file)
Step 3: Create OAuth 2.0 Mapping in NetSuite
- Upload the certificate to NetSuite
- Link it to the integration, user, and role
- Save the Certificate ID provided by NetSuite after creating the mapping
Step 4: Complete Setup in Core8
- Enter NetSuite Account ID, Client ID, and Certificate ID
- Configure integration settings and test the connection
Note: The entire process typically takes 20-30 minutes. Make sure you have administrator access to both NetSuite and Core8 before starting.
Pre-Connection Checklist
Before starting, ensure you have administrative access to NetSuite. Use this checklist to track your progress:
Essential Requirements
Configuration Requirements
Step-by-Step Setup Guide
Phase 1: Enable Core Features
Step 1: Enable Required Features
Navigation: Setup > Company > Enable Features
| Tab | Feature | Required | Purpose |
|---|
| SuiteCloud | REST Web Services | ✅ Yes | Enables API communication |
| SuiteCloud | OAuth 2.0 | ✅ Yes | Secure authentication |
| Analytics | SuiteAnalytics Workbook | ✅ Yes | Required for SuiteQL queries |
SuiteAnalytics Workbook must be enabled for the integration to work. NetSuite requires this feature for SuiteQL API endpoints - without it, data queries will fail with errors.
Step 2: Locate Your NetSuite Account ID
Navigation: Setup > Company > Company Information
- Navigate to Setup > Company > Company Information
- Look at the top section of the page
- Find and copy your Account ID
| Field | Location | Format Examples |
|---|
| Account ID | Top section of Company Information | 1234567, 1234567_SB2, tstdrv2245019 |
Save this Account ID - you’ll need it when configuring the connection in Core8.
Step 3: Create Integration Record
Navigation: Setup > Integration > Manage Integrations > New
| Field | Value | Notes |
|---|
| Name | Core8 Integration | Or your preferred name |
| State | Enabled ✅ | Must be enabled |
| Client Credentials (M2M) Grant | ✅ Checked | Required for certificate auth |
| REST Web Services | ✅ Checked | Required for API access |
CRITICAL: After saving, immediately copy this value:This credential is shown only once! If you lose it, you’ll need to regenerate new credentials in the integration record. Step 4: Create/Edit Integration Role
Navigation: Setup > Users/Roles > Manage Roles
Choose one approach:
- Option A: Find existing role → Click Customize
- Option B: Click New to create from scratch
- Option C: Find custom role → Click Edit
Role Settings:
| Setting | Value |
|---|
| Name | Core8 Integration Role |
| Center Type | Classic Center |
Phase 3: Required Configuration
Navigation: Setup > Company > Subsidiaries
| Requirement | Details |
|---|
| Minimum | At least one active subsidiary |
| Status | Must be Active |
| Required Fields | Name, Country, Currency |
| Order | Create parent subsidiaries first |
Billing > Setup > Payment Terms > New
| Term Type | Use Case | Configuration |
|---|
| Standard | Net 30, Net 60, etc. | Set Days Till Net Due |
| Date Driven | Due on specific date | Set specific due date rules |
Step 7: Multi-Currency Setup (Optional)
Navigation: Setup > Company > Enable Features > Company tab
| Setting | Notes |
|---|
| Multiple Currencies | Check if needed |
| Base Currency | Set immediately (cannot change later) |
| Currency List | Configure at Lists > Accounting > Currencies |
Step 8: Deal Stages Configuration
Navigation: Setup > Sales > Customer Statuses > New
| Stage | Suggested Probability | Type |
|---|
| In Progress | 10-25% | Prospect |
| In Discussion | 25-40% | Prospect |
| Identified Decision Makers | 40-60% | Prospect |
| In Negotiation | 60-80% | Prospect |
| Proposal | 75-90% | Prospect |
| Purchasing | 90-95% | Prospect |
| Closed - Won | 100% | Prospect |
| Closed - Lost | 0% | Prospect |
Phase 4: Generate Certificate in Core8
- Log into your Core8 account
- Navigate to Settings → Integrations → NetSuite
- Click Generate Certificate
- The certificate (.pem file) will automatically download
- Save this file securely - you’ll need it in the next phase
Phase 5: Create OAuth 2.0 Client Credentials Mapping
This phase is critical - without it, authentication will fail:
Upload Certificate and Create Mapping
Navigation: Setup > Integration > OAuth 2.0 Client Credentials (M2M) Setup
- Click New
- Fill in the following fields:
| Field | Value | Notes |
|---|
| User | Select integration user | User the integration will operate as |
| Role | Integration role from Phase 2 | Must have permissions configured |
| Application | Integration from Phase 1 | The integration you created |
| Certificate | Upload .pem file | The certificate from Phase 4 |
- Click Save
- After saving, NetSuite will display a Certificate ID. Copy this Certificate ID immediately - you’ll need it to complete the setup in Core8.
CRITICAL: This OAuth 2.0 Client Credentials mapping links your certificate to a specific user and role. Without this mapping, authentication will fail with “invalid_grant” errors. Make sure to save the Certificate ID shown after creating the mapping.
Permissions Reference
Navigate to the role’s Permissions tab and configure:
Setup Tab
| Permission | Level | Purpose |
|---|
| REST Web Services | Full | API communication |
| Log in using Access Tokens | Full | OAuth authentication |
| Access Token Management | Full | Token lifecycle |
| SuiteAnalytics Workbook | Full | SuiteQL queries |
Transactions Tab
| Permission | Level | Purpose |
|---|
| Invoice | Full | Create/update invoices |
| Opportunity | Full | Manage deals |
| Find Transaction | Full | Search records |
Reports Tab
| Permission | Level | Purpose |
|---|
| SuiteAnalytics Workbook | Full | Execute queries |
Lists Tab
| Permission | Level | Purpose |
|---|
| Customers | Full | Create/update customers |
| Contacts | Full | Manage contacts |
| Items | Full | Reference products, create discount items |
| Subsidiaries | View | Required for customers |
| Terms | View | Payment terms |
| Currency | View | Multi-currency |
| Billing Schedules | View | Billing frequencies |
| Customer Categories | View | Customer tiers |
Custom Record Tab
| Permission | Level | Purpose |
|---|
| Custom Record - il_supp_langs | View | PDF languages |
| Custom List - esc_industries | View | Industry list |
Custom Fields & Records
Part A: Create Custom Lists
1. Industry List
Navigation: Customization > Lists, Records, & Fields > Lists > New
| Field | Value |
|---|
| Name | ESC Industries |
| ID | esc_industries |
| Values | Technology, Healthcare, Manufacturing, Retail, etc. |
2. PDF Language Record Type
Navigation: Customization > Lists, Records, & Fields > Record Types > New
| Field | Value |
|---|
| Name | IL Supported Languages |
| ID | il_supp_langs |
| Type | Custom Record Type (not List) |
| Fields | Add language code and description fields |
Part B: Create Entity Fields
Navigation: Customization > Lists, Records, & Fields > Entity Fields > New
| Field | Label | ID (auto-prefixed) | Type | List/Record | Applies To |
|---|
| PDF Language | PDF Language | custentity_il_pdf_lang | List/Record | IL Supported Languages | Customer ✅ |
| Industry | Industry | custentity_esc_industry | List/Record | ESC Industries | Customer ✅ |
| Tax ID | Taxpayer ID | custentity_il_taxpayer_id | Text | - | Customer ✅ |
How Core8 Connects
Core8 connects to NetSuite using certificate-based authentication (OAuth 2.0 Client Credentials).
Authentication Details
| Configuration | Value |
|---|
| Account ID | Your NetSuite account identifier |
| OAuth Scope | rest_webservices |
| Grant Type | client_credentials |
| Authentication | JWT signed with certificate private key |
| Certificate Validity | 2 years |
Authorization: Bearer {accessToken}Accept: application/jsonContent-Type: application/jsonPrefer: transient
Endpoints Used
The integration uses these REST API endpoints:
| Endpoint | Purpose |
|---|
/services/rest/record/v1/* | CRUD operations |
/services/rest/query/v1/suiteql | Data queries |
/services/rest/auth/oauth2/v1/token | JWT token exchange |
/services/rest/record/v1/metadata-catalog | Field metadata |
Rate Limiting
Core8 automatically handles NetSuite’s rate limits:
| Error Type | Strategy | Max Retries | Delays |
|---|
| 429 Rate Limit | Exponential backoff | 3 | 5s, 10s, 20s (max 30s) |
| 401/403 Auth | Token refresh + retry | 3 | 1s, 2s, 4s (max 5s) |
| Network Errors | Exponential backoff | 3 | 1s, 2s, 4s |
Concurrency Limits
| Limit Type | Default | Notes |
|---|
| Per User (RESTlets) | 5 concurrent | Standard limit |
| Integration Total | Varies | Based on licenses |
| Monitoring | Setup > Integration > Integration Governance | Optional admin tool |
Data Access
The configured permissions provide access to these NetSuite tables via SuiteQL:
Note: Custom tables appear with prefixes like customrecord_ and customlist_ in queries.
| Table | Purpose | Operations |
|---|
customer | Customer records | Full CRUD |
contact | Contact management | Full CRUD |
item | Product catalog | Read only |
transaction | Invoices & opportunities | Full CRUD |
subsidiary | Organization structure | Read only |
term | Payment terms | Read only |
currency | Currency settings | Read only |
billingSchedule | Billing schedules | Read only |
entitystatus | Deal stages | Read only |
customercategory | Customer tiers | Read only |
Post-Setup in Core8
Phase 6: Complete Setup in Core8
- Return to Core8 (from Phase 4 where you generated the certificate)
- Enter the following credentials:
- NetSuite Account ID (from Step 2)
- Client ID (from Step 3)
- Certificate ID (from Phase 5)
- Click Connect
- Test the connection to ensure authentication works
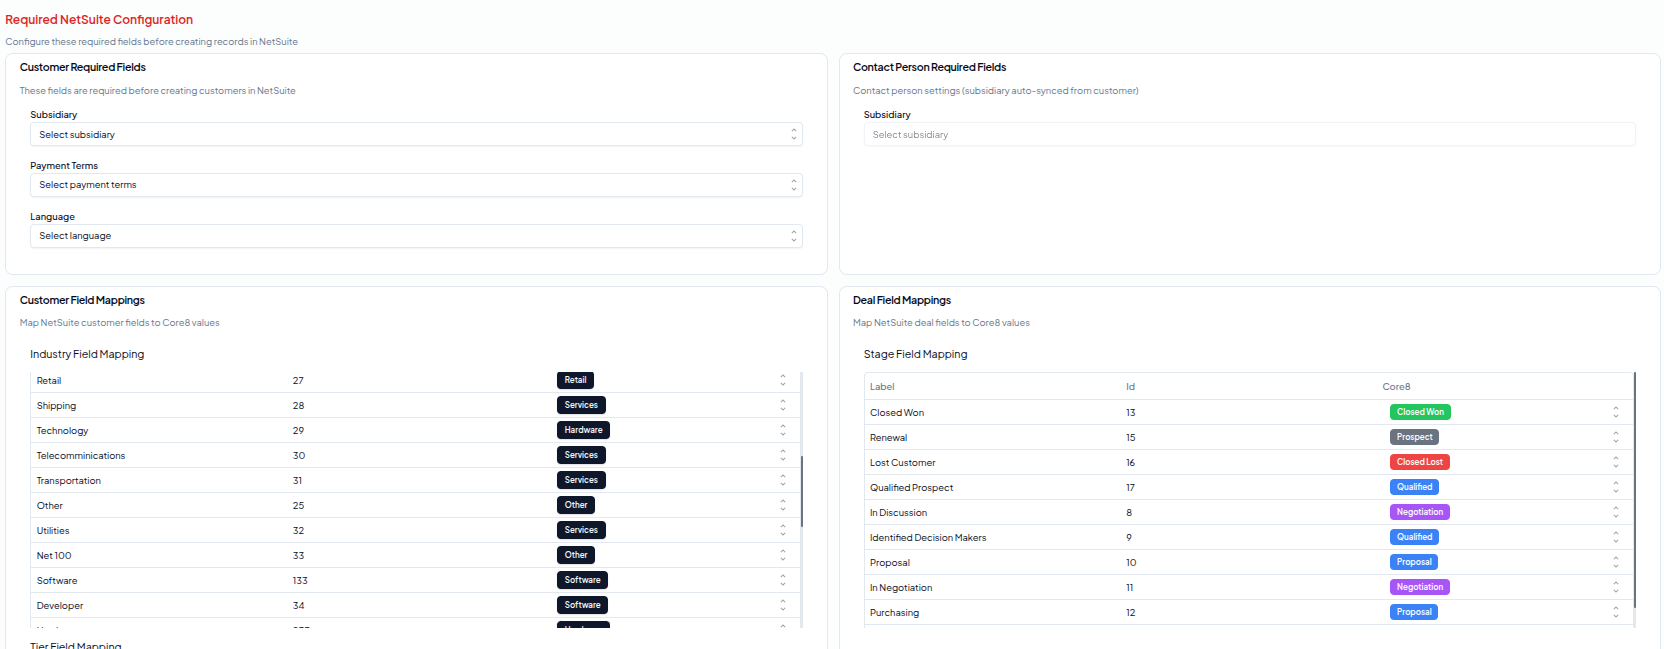 Once connected, configure these settings in the Configuration tab:
| Setting | Purpose |
|---|
| Default Subsidiary | Required for new customers |
| Default Payment Terms | Required for new customers |
| Default PDF Language | Customer communication preference |
| Field Mappings | Map NetSuite fields to Core8 |
Sync Options per Object Type:
- Always - Full bidirectional sync
- Read-Only - Import from NetSuite only
- Never - No sync for this object type
Note: Products in NetSuite are always read-only in Core8.
Troubleshooting
Common Connection Issues
| Error | Check Location | Solution |
|---|
| ”Invalid Grant” | OAuth 2.0 Mapping | Check OAuth 2.0 Client Credentials mapping exists |
| ”Invalid Client” | Integration Record | Verify Client ID matches your integration |
| ”Invalid NetSuite Account ID” | Core8 Setup | Check format (e.g., 1234567 or 1234567_SB2) and verify it matches your NetSuite account |
| ”Invalid certificate ID” | Core8 Setup | Verify Certificate ID matches the one shown in NetSuite OAuth mapping |
| ”Certificate not found” | Core8 | Generate new certificate and re-upload |
| ”JWT signature invalid” | Certificate | Ensure certificate matches the one in NetSuite |
| ”429 Too Many Requests” | N/A | Wait for retry (automatic) |
| “401/403 Unauthorized” | User/Role permissions | Check OAuth mapping user has correct role |
| ”No subsidiary selected” | Configuration | Select default subsidiary |
| ”No term selected” | Configuration | Select payment terms |
| ”No language selected” | Configuration | Select PDF language |
Certificate-Specific Issues
| Issue | Solution |
|---|
| Certificate expiring soon (< 60 days) | Generate new certificate in Core8 and update NetSuite |
| Lost private key | Generate new certificate - private keys cannot be recovered |
| Multiple certificates | NetSuite supports multiple active certificates for rotation |
| Certificate expired | Generate new certificate immediately to restore connection |
Common Configuration Issues
| Issue | Check Location | Solution |
|---|
| Empty subsidiary list | Subsidiaries setup | Create at least one |
| Missing custom fields | Custom Fields | Create required fields |
| No payment terms | Payment Terms | Add standard terms |
| SuiteQL errors | Enable Features | Enable SuiteAnalytics Workbook |
| Product sync errors | Products | Sync products before using in deals/invoices |
| Network timeout | Connection | Check network/firewall settings |
Testing Your Setup
Optional Test Data
If you want to test with sample data:
| Record Type | Navigation | Required Fields |
|---|
| Customer | Lists > Relationships > Customers > New | Company Name, Subsidiary, Terms |
| Product | Lists > Accounting > Items > New | Type: Non-inventory or Service |
| Opportunity | Transactions > Sales > Create Opportunity | Link to test customer |
Verify Permissions
- Log in as integration user (or use “Login As”)
- Try accessing each record type
- Verify you can view required lists
Additional Resources
Documentation
| Support | Contact | Include in Request |
|---|
| Core8 | support@core8.com | NetSuite Account ID, Screenshots, Error messages |
| NetSuite | Via NetSuite UI: Support > Contact Support | Reference REST Web Services and OAuth 2.0 |
Visual References
Look for these key elements in NetSuite:
- Enable Features Page - Checkboxes for required features
- Company Information Page - Account ID at the top
- Integration Record - Client ID display
- Manage Roles Page - Edit/Customize buttons
- Permissions Tab - 5 sub-tabs for different permissions
- Custom Field Creation - Entity field forms
Document Version: 2.1 | Last Updated: January 2025 | Validated against Core8 codebase